Friday, October 27, 2017

Visit to the B-17 "Aluminum Overcast"

Last weekend (Oct. 13-15), the B-17G "Aluminum Overcast" paid a visit to the Jackson, MS area.  She flew into the John Bell Williams Airfield in nearby Raymond.  There were both flying tours and static tours available.  I went out to see her since my father flew on one during WW2.  You can see the other posts I made about my father's service by following the "8th Air Force" subject link.

She belongs to the Experimental Aircraft Association who were the ones who brought her here.  She was delivered to the Army Air Force in May 1945, too late to see active service.  But with the exception of a replica top turret, she has been restored to her 1945 glory.  The latter is a shame since that was my father's duty position.

I took a number of pictures which are included below for your enjoyment.  Remember to click on them to see a larger view.

She carries the colors of the 398th Bombardment Group (Heavy) and is dedicated to B-17G #42-102516 which was shot down on its 34th combat mission over Le Manior, France on August 13, 1944.

Poster on display which is cropped and blown up in the three images below.


The tour entered here at the nose.

The nose art

Bomb bay with decommissioned bomb load.

Looking forward through the bomb bay toward the top turret and cockpit.

Ball turret position

Port side waist gun position

Outside showing ball turret with hatch opened to show gunner's cramped position

Looking up through bomb bay into top turret position


I tried to get some other pictures, particularly in the nose bombardier/navigator position and in the cockpit but the glare from the outside was too much for my camera.  Hope you enjoyed the ones I did take.

Friday, September 1, 2017

From ACW to FPW

Although I haven't made any posts lately, I have been painting away on my Franco-German War (as I call it) figures as well as mounting some ACW pictures painted by my friend, Larry the Marine.

After hosting a FPW game in late July, I got on a painting kick to finish some French and Prussian figures.  I already had one battalion of the French Republican Volontaires de l'Ouest painted.  I bought enough figures at Historicon to complete the other two battalions of the regiment.  Here is the 1st battalion, minus its flag which has since been prepared and mounted.


The Volontaires de l'Ouest were formed from the old Pontifical Zouaves and were probably one of the better regiments in the Republican armies to the south of Paris.  In my army, they form part of the XV Corps, Army of the Loire.  The figures are actually Union zouaves from Sash & Saber's ACW line since I couldn't find any appropriate zouaves wearing kepis.

Continuing with the FPW theme is the headquarters of IX Korps, 2nd Prussian Army which in my army is deployed south of Paris to keep the Loire rabble from interrupting the siege of Paris.


This HQ group utilizes a mix of Foundry, Castaway Arts, and Irregular (I think) figures to depict General der Infanterie Albrecht Gustav von Mannstein and his battle staff.  His uhlan aide is handing him a dispatch from a subordinate commander while his artillery staff officer keeps track of the battle through his binoculars.

Turning to the American Civil War, my gaming friend Larry the Marine recently painted a division of Union troops for me.  I'm organizing Union and Confederate forces for the Middle Tennessee campaigns of 1863 using the On to Richmond rules where each brigade is composed of 3 to 8 stands of figures.  Here is Beatty's 1st Brigade, Negley's 2nd Division, Thomas' XIV Corps, Army of the Cumberland.

Beatty's battleline ready to give fire into the attacking Confederates.
Right flank of the line.
These are Old Glory 15s Union figures from which I have trimmed the bayonets as they are in firing poses.  I use 8 figures on all the bases of each brigade except for one upon which I place a mounted officer (the brigade commander) and 6 figures.

I've made previous posts showing some of my first Union and Confederate units which you can see by clicking on the "American Civil War" label in the list below.


Saturday, July 1, 2017

Can You Hear Me Now?

On Thursday and again today, we played a small Franco-Prussian War game involving a French attack on a Prussian supply convoy.  On both occasions, the French won handily.  But that's not the point of this post.

The senior Prussian commander was a conversion that my good friend and gaming buddy Jay, Lord Sterling had made.  He used a standing figure in a European military style overcoat and added a Prussian head in helmet.

EDIT:  Since I posted this, I found that I have the same figure who is actually holding what appears to be a cigar.  So not a conversation, just an unusual pose that led to the funny appellation.

Can you hear me now?

We though that he looked like he was trying to make a cell phone call.  Jay said that he thought the original figure did have a cell phone or a walkie-talkie in his hand.  Just goes to show that you can't get away from the blasted devices no matter where in time you travel.


Thursday, April 6, 2017

Amusette for Staffeldunkel Jagers

The Jager Corps Staffeldunkel of the Margraviate of Carpania has added some additional firepower - an amusette!  Manned by two volunteers from the corps, the amusette should prove useful to the corps as it acts as part of either the advanced guard or the rear guard for the Carpanian field force.

Amusette 2-man crew with Major Staffeldunkel

Rear view of the amusette

Another rear view with Major Staffeldunkel supervising the firing

The amusette is a Fife and Drum Miniatures piece (# AE-006).  I obtained it from Der Alte Fritz some time ago and have just gotten around to painting it.  The crew are in the green uniform of the Staffeldunkel jagers with Britannian light dragoon helmets procured by the major so the team can be more distinctive.

Tuesday, April 4, 2017

Order of Tandem Limber Horses?

I am almost finished with the limber and horses for the Fife and Drum AE-005 limber but I'm not sure of the order in which the two horses should be placed.  There is no picture in the Fife ad Drum/Minden web store to help.  Should the ridden horse come in front or should it be in back close to the limber?

Ridden horse in front?

Or ridden horse in back close to the limber?
So, what is the wisdom of the "hive mind?"

Many thanks,

Jim


Tuesday, February 21, 2017

First Big WW2 Microarmor Battle

Our war gaming group had its first big WW2 micro armor battle using the Blitzkrieg Commander II rules.  It was set in the North African desert somewhen around the Crusader offensive period.  The battle pitted parts of the German 15th and 21st Panzer Divisions against parts of the British 7th Armored Division.  The troops were supplied by Electric Ed and me and the terrain by me.  We played on an 8' x 5' table set up in my garage.

The British Germans [oops!] had the 5th Panzer Regiment Kampfgruppe (21st Panzer Division) and the 8th Panzer Regiment Kampfgruppe (15th Panzer Division), while the British had the 4th Armored Brigade Group and the 7th Armored Brigade (both of 7th Armored Division).  There were three players per side, including me who also served as the game umpire/manager.

In BKC-II terms, the Germans had some 9690 points and the British had some 8605 points, each divided into two battle groups.  The Germans had four panzer battalions, plus reconnaissance, artillery, and anti-tank guns.  The British had six armored regiments, plus reconnaissance, artillery, and anti-tank guns.  Neither side had any infantry.  Almost all of the vehicles are from GHQ's very nice 1:285 scale range of WW2 micro armor.

The scenario was an encounter battle as both sides sought to reduce their opponents strength and break one or both of the enemy battlegroups.

And now on to the action.  (Note:  All photos taken from the British point-of-view.) [Please click on the photos to enlarge them.]

On the left, British 8th Hussars (Crusader I) maneuver against a German panzer battalion.  The clear stones behind the tank stands indicate action taken during the initiative phase.

In the center, British 2-pdr portee anti-tank guns and 7th Hussar Regiment (M3 Honey), supported by two batteries of 25-pdr field guns,  maneuver against German reconnaissance units and a panzer battalion.  Smoke indicates portees that have been destroyed while small blue die indicates a number of hits on a stand.

Close-up of the burning portees with the battalion command group on the round base.

Back on the left (by the way, this was my command) the 8th Hussars began to suffer from the fore of the German panzers.

A close-up of the initial damage to the Hussars Crusaders with one destroyed and three others hit and suppressed.

A view of the British center and right flank.  In the center (from left) are the 7th Hussars (M3 Honey) and the 44th RTR (Valentine) while the 2nd RTR (A13) are just beyond them.  On the far right are the 6th RTR (Crusader I).
A close-up of the 44th RTR (Valentines) as they advance through a rough area.  This didn't affect the tanks movement at all.

Back on the left, the 8th Hussars are taking more hits.  An understrength squadron has turned to face the German recce units that appeared on the regiment's flank.  One of the Crusaders has taken hits from the German recce guns.

On the right, Ed (commander of the 7th Armored Brigade) points out some of his tanks from the 6th RTR that have either been destroyed or damaged.

Another shot of the action without Ed's hand in the way.  You can see that the German fire has been particularly effective on this side of the action.

A close-up of some of the damage suffered by the 6th RTR.

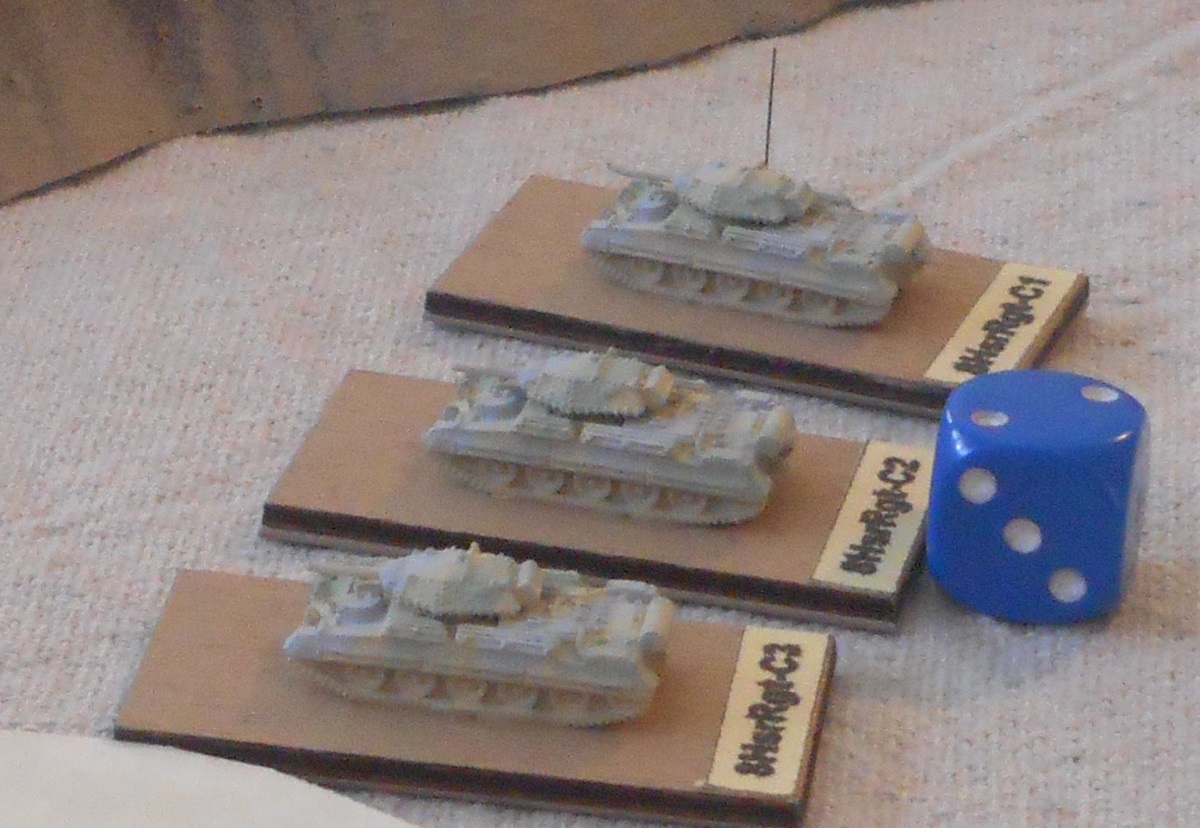
Back on the left, the German recce units are stymied by the 8th Hussars squadron.  One of the German recce units (Pz II from the 5th Panzer Regiment headquarters) has been suppressed by the British fire.
And a close-up of those three Crusaders.
The German tank and anti-tank fire was very effective, knocking out almost all of the 2-pdr portees, most of the British recce, and a significant number of British tanks.  The battle ended after the fourth (of eight planned) turns with a significant German victory.

The British 7th Armored Brigade broke and the 4th Armored Brigade Group was very close to breaking.  On the German side, only the 5th Panzer Regiment Kampfgruppe was very close to breaking while the 8th Panzer Regiment Kampfgruppe was still full of fight.

We enjoyed the rules and the game.  This is definitely a rule set we'll continue to play as Ed and I are still in the process of raising our troops.  Our target is for the Germans to have the 15th Panzer Division and the 5th Light/21st Panzer Division, while the British will have the 4th and 7th Armored Brigades of the 7th Armored Division and the 7th and 11th Indian Brigades of the 4th Indian Infantry Division, reinforced by two armored regiments from the 1st Army Tank Brigade.


Saturday, February 11, 2017

More WW2 North Africa

As I stated in the last post, I do have some additions to my 1:285 scale German and British battle groups.

But first, some additional formations not pictured in the last post:

British 4th Armored Brigade Group command with its headquarters element and two M3 Honey tank platoons

German 5th Panzer Regiment command with its headquarters element and regimental Pz II reconnaissance platoon
Both of the headquarters elements will have more "foot" figures added to the bases.

German panzer battalion motorcycle reconnaissance platoon (one of two in the regiment)

German panzer battalion engineer platoon (one of two in the regiment)

German PaK38 50mm antitank gun, deployed and "limbered"
So far I have two of these sections painted which form part of the 39th Panzerjager Battalion (motorized),
5th Light/21st Panzer Division

And now pictures of the two battle groups.

The British 4th Armored Brigade Group (XXX Corps) was formed particularly for the Operation Crusader in November and December 1941.  I'm basing my main British armored force on this brigade group.  Not all of the formations of the brigade group are pictured, particularly the infantry component, the 2nd Scots Guards.  In addition, the brigade group temporarily includes the 44th Royal Tank Regiment (Valentine infantry tanks) which is actually part of the 1st Army Tank Brigade, XIII Corps, and will eventually be moved to the 11th Indian Brigade, 4th Indian Division, when I raise that brigade.

4th Armored Brigade Group
[front - brigade group headquarters]
[on left - 3rd RTR; center - A Squadron, Kings Dragoon Guards (front) and A and B Batteries, 102nd AT Regiment RHA (rear); right - 8th Hussars]
[rear - 44th Royal Tank Regiment]

The German 5th Light Division/21st Panzer Division was in the midst of reorganizing from its light composition to its panzer composition.  I've taken the deliberate step of "freezing" its organization at the light composition.  Not all of the formations of the division are pictured, only the 5th Panzer Regiment and some supporting divisional reconnaissance, artillery, and antitank elements.

5th Panzer Regiment (reinforced)
[front - regimental headquarters]
[left - 1st Panzer Abteilung (Battalion); center - 605th and 39th Panzerjager Battalions; right - 2nd Panzer Abteilung]
[rear - 1st Battalion, 75th Artillery Regiment]

There will be more added to these battle groups, so stay tuned.

Friday, February 10, 2017

I'm Back with WW2 North Africa

Well, it has been months since I've posted anything.  A combination of a leg injury and a lackadaisical attitude have temporarily stymied my energy to post anything.

But that has changed as my leg is well on the way to recovery and my attitude has been correspondingly adjusted.

Back a number of months ago, three retired friends and I had several Thursday afternoon WW2 armor games using Lord Sterling's miniatures and several sets of rules he wanted to try.  These games pitted Americans and Germans in 1944 Northwest Europe.  They were fun.  Then one of my friends, Electric Ed, and I began to pontificate on how nice it would be to expand into the early North African desert (prior to Alamein).  One thing led to another and we are now building the 15th Panzer Division (Ed) and 5th Light/21st Panzer Division (me) for the Germans and several Commonwealth brigade groups for the British.

I ran a small game this past Thursday to introduce the "Blitzkrieg Commander II" rules.  It worked well I think.  I'll run another one next week and then a larger battle next Saturday for our larger wargaming group.

So far I've organized, painted, and mounted almost the entire 5th Panzer Regiment as well as an armored reconnaissance company, an armored tank destroyer battalion, and an antitank battery for the Germans.  For the British I have three armored regiments (read battalions), a reconnaissance squadron (company), and two understrength RHA antitank batteries.  I'm using the very nicely made GHQ Micro-Armor vehicles and figures.  The British forces will comprise the 4th Armored Brigade Group and the 11th Indian Infantry Brigade.

Some of my British vehicles are pictured below:

Three different British tanks - left is a Crusader I, center is an M3 Honey, and right is a Valentine II

Crusader I of the 8th Hussar Regiment, 4th Armored Brigade Group

M3 Honey of the 3rd Royal Tank Regiment, 4th Armored Brigade Group

Valentine II Infantry Tank of the 44th Royal Tank Regiment, attached to the 11th Indian Infantry Brigade
Marmon-Herrington Armored Car (Boys ATR & MG) of the Kings Dragoon Guards, 4th Armored Brigade Group

Marmon-Herrington Armored Car (Italian 37mm ATG) of the Kings Dragoon Guards, 4th Armored Brigade Group
Daimler Dingo Scout Car of the Kings Dragoon Guards, 4th Armored Brigade Group

2-pdr Antitank gun portee of the 102nd Antitank Regiment, RHA (Northumberland Hussars), 4th Armored Brigade Group
And some of my German vehicles are below:

Command Tank (Panzer I chassis) of the 5th Panzer Regiment

Panzer II F of the 5th Panzer Regiment

Panzer IV F1 of the 5th Panzer Regiment

Panzer III F of the 5th Panzer Regiment
SdKfz 222 Armored Car of the 3rd Panzerausklarungs Abteilung

SdKfz231 (8 rad) Armored Car of the 3rd Panzerausklarungs Abteilung

Panzerjager I of the 605th Panzerjager Battalion

Flak 36, 88mm ATG, with SdKfz 7 of the 1st Battalion, 33rd Flak Regiment
 As you can see from the above pictures, I've added unit identification labels to the back of each stand.  The British labels include the regiment (or battalion) name or number, the squadron/company/battery letter, and a number designating the vehicle within that unit.  The German labels are a take-off of the German regimental identification system.  Since all stands represent a grouping of 3-6 vehicles (platoon or battery) then the label will indicate exactly to what organization the stand belongs.  Two examples are:

British -- 1st Troop, Battery A, 102nd Antitank Regiment

German -- Company Command, 5th Company (2nd Battalion), 5th Panzer Regiment

Maybe tomorrow I can get some panoramic pictures of the two forces so you can see the extent of my newest madness.  More later!