And finally, a week after it occurred, here is the report on the
Assault on Fort Khalaam, which I ran at our regional convention,
Bayou Wars. The game pitted an Anglo-Indian field force against a Pathan-like tribe called the Haddabiera. We used
The Sword and the Flame rules, 20th Anniversary Edition, by Larry Brom. [As usual, please click on the photos for larger versions.]
 Convention booklet cover
Khalaam Field Force (Anglo-Indian)
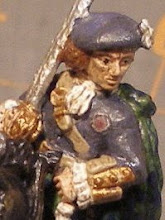
Commander with escort (one hussar and one lancer)
One company of 93rd Argyll and Sutherland Highlanders (company commander, color sergeant, and two 20-figure platoons)
One company of 30th Punjabi Infantry Regiment (company commander, company havildar major, and two 20-figure platoons)
One platoon of 5th Ghurkha Rifles (20 figures)
Cavalry commander (major of the 10th Hussars)
One troop of 10th Hussar Regiment (12 figures)
One troop of 10th Bengal Lancer Regiment (12 figures)
One battery of Royal Artillery (battery commander, 12 gunners, and 3 guns)
One battery of Indian mountain artillery (battery commander, 12 gunners, and 3 guns)
The commanders of this fine Anglo-Indian force were:
 (from left) Jonathan Shushan (Highlanders), Jay Stribling (overall commander and Indians), and Duane Guilbeau (cavalry and Ghurkhas)
The Haddabiera tribe had gathered warriors from near and far, even dipping into the Royal Aooghastan Army for a unit.
Emir Tubeir and his personal banner bearer
Black Leopard Clan (clan leader, two 20-figure rifle units, one 20-figure spear/sword unit)
Silver Fox Clan (clan leader, two 20-figure rifle units, one 20-figure spear/sword unit)
Soaring Hawk Clan (clan leader, two 20-figure spear/sword units)
Cavalry commander
Emir's Bodyguard (12-figure rifle armed cavalry unit)
Royal Aooghastan cavalry troop (12-figure carbine armed cavalry)
two guns (one modern with four gunners and one ancient with 4 gunners) [The Haddabiera were aided by an artillery advisor from the
Khan of the Steppes (the Russian Tsar), one
Ivan Skavinsky Skavar (one version of the poem "Abdul Abulbul Amir"). As long as he stayed with the modern gun, it would never have to roll to see if it could fire.]
Commanding these valiant warriors were:
 (from left) Paul Arceneaux (Silver Fox clan), Larry Reeves (overall commander and cavalry), Josh Switzer (Soaring Hawk clan), and Larry Brom (Black Leopard clan)[P.S. The special t-shirt Larry Brom is wearing commemorates the 30th Anniversary of The Sword and the Flame and can be ordered from Sergeants3.]
As you can see, I was honored with the participation of the rules author, Larry Brom (far right in above picture), who ably defended the Fort of Khalaam until late in the game when he was called away. Josh Switzer then took over his command.
Jay Stribling (my college room mate and long time wargaming buddy), Larry Reeves, and Josh Switzer are all members of our
Jackson Gamers group.
The objective of the Khalaam Field Force was to take and destroy the Haddabiera hill fortress at Khalaam (pictured below) and destroy the ability of the Haddabiera to threaten the peace and stability of the Vale of Khalaam and the rest of the North Central Frontier of Aooghastan. The Haddabiera's objective was defend the fort and to kill as many of the infidel British and idolater Indians as possible.
 The Hill Fort of Khalaam, garrisoned by a rifle armed unit (20 figures) from the Black Leopard clan. The Emir Tubeir and his personal banner bearer were also in the fort.
The Field Force started all set-up on the battlefield, with the Highlanders and the Royal Artillery on the right facing the fort, the Indians (infantry and artillery) occupying the village of Khalaam in the center, and the cavalry and the Ghurkhas on the left flank facing the Watchtower Hill.
 Highland Company skirmish line facing the fort.
The Haddabiera started the game with one unit from each of the four commands hidden in concealing terrain, a unit of the Black Leopard clan in the fort, and both guns hidden in concealing terrain. All the other units would enter as reinforcements on Turns One and Two as the movement cards were drawn.
 The troop of Bengal Lancers sends out scouts who discover a force of Haddabiera on the slopes of Watchtower Hill.
Visibility into concealing terrain could only be declared by the Anglo-Indians when they were within 6" (~150mm) of the concealing terrain. The Haddabiera had to deploy their unit at that time. The Haddabera would also be deployed if they opened fire on the Anglo-Indians, which is how the guns were discovered.
 The Indian company was deployed within and to the left of the village of Khalaam with their artillery on the far side of the village (and mostly hidden behind the far left building). In the far distance is the battery of Royal Artillery on Gun Hill behind siege gabions.
The Royal Artillery and, for one turn, the Indian artillery concentrated on breaching the near wall of the fort. The Indian infantry in the center and the cavalry and Ghurkhas on the left skirmished with the opposing Haddabiera in an effort to whittle down their numbers and to interrupt the flow of reinforcements towards the fort. The Highlanders kept the fort's defenders suppressed, discovered and destroyed a Black Leopard clan unit in some rough terrain to the right of the fort, and held off a charge by both Haddabiera cavalry units. The wall was breached by Turn 4 and the Highlanders moved up to assault positions at the base of the breach.
 One Highland platoon advances to the base of the breach, trades rifle fire with the defenders, and prepares to assault the breach. On the right, the massed Haddabiera cavalry attack the other Highland platoon, causing tremendous casualties before being totally destroyed by rifle fire from the Highlanders, gunfire from the RA battery, and mounted carbine fire from the Hussars, who rode all the way across the table to arrive in the nick of time.
With hopes of defeating the Anglo-Indians fading the Haddabiera launched several frenzied attacks. The cavalry attack has been mentioned already, but the Soaring Hawk clan also attacked the Indians in the village. Passing their morale test, the Indians were able to withdraw in front of the attack and lure the Soaring Hawks into a fire pocket.
 The Soaring Hawks (on the oval base in the distant center) shortly before they were shot to pieces by the Punjabi infantry. In the foreground is the Indian mountain battery which is aiming at some Haddabiera reinforcements in the distance. And just visible at the bottom of the picture are the heads of some of the Hussars as they ride over to the right flank.
The procedure for the assault on the breach was for the assaulting force (in this case a platoon of Highlanders) to stop at the base of the breach and trade rifle fire with the defenders on the first turn. The second turn would see the Highlanders climb to the top of the breach where a melee would be fought with the defenders. Presuming the Highlanders won that melee, the defenders would retreat into the courtyard where a second melee would be fought. If the Highlanders won that melee then the fort would be theirs.
 The Highlander 2nd Platoon assaults the breach. The Emir's banner can be seen fluttering in the courtyard. The three Highlanders facing to the right are part of the 1st platoon, while the three Haddabiera outside the fort's gate are the remnants of a Soaring Hawk clan unit that tried to reinforce the fort.
In
The Sword and the Flame rules, the attacker must pass a "Charge Completion" morale roll. The British number is 18 or less on a D20. The Highlanders rolled well below that and flooded onto the breach. The defender must then pass a "Stand and Fight" moral roll. The Haddabiera were using the Pathan statistics and had to roll a 10 or less on a D20. Wanting to have a melee, I bumped the number up to a 15 or less because the Emir was with them and they were defending the tribal home fort. Unfortunately the die was against them and they rolled a 20!
 The Emir and the remnants of the fort's defenders flee over the back wall, heading for the mountains further up the Vale of Khalaam, there to hide and wait for another opportunity to smite the infidels and idolaters
!
The game ran very smoothly and everyone seemed to have a good time. Having it go down to a final opposed die roll (the two morale rolls) instead of just petering out as many games tend to do made it, in my mind, successful. Of course it would have been even better if there could have been a melee for the fort, but one can't have everything.
I plan on writing this scenario up in more detail and posting it on the ColonialWars and SwordFlame Yahoo groups. I'll announce on both this blog and on TMP when it is posted. I'll also make it available to any gamers who aren't on either Yahoo group with those details included as part of the announcement. One comment of note at the end of the game was a recommendation that the British and Indian artillery batteries be reduced from 3 guns and 12 gunners to 2 guns and 8 gunners each. The artillery was just too powerful in this particular scenario. This change will be incorporated into the scenario writeup.