It is been some time since we played this game using the newly released Lion Rampant rules. Finally I have some time to make the game report.
Six of us gathered on February 21 at my church's Fellowship Hall. The Duke of Bentwood and his allied vassals were attempting to put down an uprising of several of his discontented vassals. The scenario we used was the first one in the rule set, called "Bloodbath" which was a straightforward fight between the two sides. Each player had a 24-point retinue. For the most part, the figures are all vintage Miniature Figurines, Scruby, Ral Partha, and other 1970s and 1980s manufacturers.
Bentwood - Alex K. (Bentwood Castle guard), Jay S. (Lord Sterling) (Kilgarren Castle guard), and Phil Y (Cove Hold guard).
Rebels - Bill H. (Teutobergerwald), Ed S. (Men of Haven and the Dale), and Sean P (High Tor Keep).
I think I'll just let the pictures speak for them selves. Unless otherwise indicated, the photos were taken by me. Please click on them for a larger image.
 |
| The Bentwood commanders - Alex, Jay, and Phil - deploy their retinues. |
 |
| Two of the rebel commanders - Sean and Bill - deploy their retinues. I initially commanded the third rebel retinue (on the far end) until Ed arrived. |
 |
| Phil smiles as he hopes Ed's retinue is falling into his trap. The Doctor observes the advance of Ed's mounted sergeants. |
 |
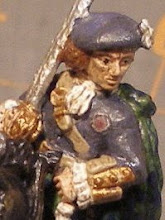
| One of Ed's foot sergeant unis advances. Led by "Boudicea" (blue cloak), this mixed figure unit acquitted itself fairly well in the battle. [photo by Ed] |
 |
| Sean's foot retinue advances in the center. In the distant, Alex's right flank retinue is visible. |
 |
| Another view of the center and left of the rebels as they attack the Duke's forces. Sean's retinue is laid out with a two expert foot yeomen units and a foot sergeant unit in the first line (right to left) and a foot archer unit and expert foot sergeant unit in the second line (right to left). Beyond Sean's left are several of Bill's Teutobergerwald units. Opposite them are units of Alex's right flank and Jay's center of the Duke's army. [photo by Ed] |
 |
| Ed's mounted sergeants run into the very accurate bolts of Phil's crossbowmen. The pointed oval marker behind the two mounted sergeants left alive denotes that they are battered. See previous post for how I made these. |
 |
| Bill's left flank Teutobergerwald retinue advances against Alex's forces. |
 |
| Bill's Teutobergerwald foot sergeants have tangled with Alex's "blue" mounted men-at-arms. Bill's unit was in schiltron formation which gives it an advantage in defense, especially against mounted troops. Both sides lost one man, but Alex's mounted unit had to retire from the action since they didn't break Bill's schiltron. The gold rings around selected figures indicate the individual unit "commander." [photo by Ed] |
 |
| A closer view of Bill's Teutobergerwald schiltron. These are vintage Miniature Figurines figures. [photo by Ed] |
 |
| Sean's and Bill's rebels start to mix it up with Alex's and Jay's "loyalists." |
 |
| Bill's mounted men-at-arms move over a hill and discover Alex's foot sergeants who immediately form a schiltron against them. |
 |
| One of Alex's mounted men-at-arms units moves around a hedge to get at the rebels. |
 |
| While Alex's "blue" mounted men-at-arms are re-grouping, his "red" mounted men-at-arms units are attacking one of Bill's mounted men-at-arms units. In the distance by the hedge, one of Jay's mounted men-at-arms units (light blue) is attacking a unit of Sean's retinue. |
 |
| And Jay's "light blue" mounted men-at-arms slam home against Sean's expert foot sergeants with their great battle axes, while one of Bill's Teutobergerwald foot sergeant units looks on. |
At the end of the fight (which lasted 6 turns, if I remember correctly), the losses were:
Duchy of Bentwood (15 units) - 4 destroyed, 4 battered, 7 still in fight
Rebels (15 units) - 7 destroyed, 2 battered, 6 still in fight.
So the Duke of Bentwood can claim this as a victory but the rebels will be continuing the fight against him.


3 comments:
Since the rules as written are for a one-on-one contest for two players, how did you handle a six-player game?
What changes or house rules did you employ?
(Note that I have purchased the rules and am eager to play them . . . but am also interested in any multi-player adjustments that people are using.)
-- Jeff
I assigned cards to the six players, three red and three black. Then I used the cards after shuffling to indicate who would attempt to activate his troops. At the end of each turn I would shuffle them again. I tried to ensure that the player who went last on one turn didn't then get to go first on the next turn.
Other than that we tried to follow the rules as they were written. But we think we'll need a few modifications for our next outing.
Jim
Nice looking game, love your knights and hills...
Post a Comment