Showing posts with label Very British Civil War. Show all posts

Wednesday, October 28, 2020

Very British Civil War Civilians


Finally, after over six years, I completed painting a group of civilians for my Very British Civil War period.  I first received these figures in July 2014 [ link ] from Recreational Conflict where they are still being produced.  More details about the figures are in the July 2014 post at the above link.

Please click on the individual pictures for larger images.

From back in 2014, they looked like this:

Male and female ambulance staff

Nurse and three store clerks

Now after finally getting them painted, they look like this:

Three store clerks, nurse, two ambulance staff

I still will need to do some terrain work on the bases, but that will come later once I get a sufficient number of figures ready to tackle that task.


Wednesday, December 26, 2018

Almost Year-End Wrap-up

Christmas brought some gaming items:

An early war squad of 28mm British infantry from Warlord and an early war squad of 28mm Germans from Artizan Designs, both of which will be used as my "contribution" for our group's WW2 skirmish action.

A Great War Miniatures WW1 British artillery crew for my British 18-lbr I obtained several years ago which will be part of my Very British Civil War gaming.

Also for VBCW, a Warlord improvised armored car, the "Malcom-Campbell" which I just had to add as those are my two middle names!
It has a resin body and white metal wheels, bumpers, and half-rifles.  This will be a nice little addition to my VBCW forces.

And two books - The Komnene Dynasty, Byzantium's Struggle for Survival: 1057-1185 by John Carr and A Battlefield Atlas of the American Revolution by Craig L. Symonds.  Both should make interesting reading.

I've not completed as much painting this month as I wanted, mainly due to a nagging cough from a month-long flare up of my allergic rhinitis.  It has robbed me of my stamina later in the day.  I did remount some pre-painted 25mm MiniFig Wurttemburg troops (a battalion of line infantry and a battalion of light infantry) as well as painted a few figures to complete their organization.  they were used in a fictional 1813 battle preceding Leipzig that pitted a retreating French force and their pursuing Prussians.

As a result of that game, I spent several days going through my 25mm Napoleonic French and Prussian forces and laying out a schema of painting next year to try and complete some of the commands.  As part of that inventory I redid my Napoleon command group by removing a mounted escort (needed him elsewhere), changing Napoleon's horse (also needed elsewhere), and adding two Old Guard escorts (who were extra figures).  The result:
Napoleon, with his faithful Mameluke Roustam, an ADc on foot, and a sergeant and grenadier of the Old Guard keeping close watch.  All of the figures are Miniature Figurines except Roustam's horse which is a Warrior figure.  Roustam himself is an earlier MiniFig casting while all the others are later MiniFigs castings.

I'm still hoping to get 24 more Royal Ecossais figures completed by the 31st.  If so, I'll make them my last post of the year.

Here's hoping everyone had a blessed and merry Christmas and will have a prosperous New Year!


Saturday, April 4, 2015

Fight for the Fosse Way

In preparation for a big Very British Civil War game at the UK's Partizan convention on May 31, Pete Barfield (Panzerkaput) asked that VBCW gamers run a game using the terrain that he will use.  We were to inform him of the results so he could make a compilation and use them as the starting point for the big game.


Since I was planning on running a VBCW game this spring, using Pete's scenario made it somewhat easier for me.  So with the basics out of the way, then all I had to do was figure out which rule set to use - "Went the Day Well?" or "The Sword to Adventure."  Of course I chose one that we've never played - "Rugged Adventures" from Pulp Miniatures:  http://pulpfigures.com/rugged_adventures/ and http://pulpfigures.com/downloads/.  I made up ten different commands, five for each side, assigned a playing card to each, and had the 7 players who showed up draw for their commands.  It turned out that we had four on the Royalists side (2 Royalists [Jay and Larry] and 2 BUF [Ed and Sean]) and 3 on the Anglican Coalition side (Anglican LDF [Travis], Socialist Brewery workers [Mike], and red sailors [Phil]).  What I didn't tell anyone was that there was a command of Ghurkhas inside one of the farmsteads escorting part of the crown jewels [game master contolled].  Surprise! Surprise!


Ed and I took a lot of pictures but I only decided to use a small number.  The fighting broke down into three smaller battles over the three farmsteads.  Pete provided a table layout which I tried to follow as best as I could.

The Anglican Coalition entered from the top (red force) while the  Royalists entered from the bottom (blue force).

 
Here's my version with Brookfield Farm in the foreground.  If you look closely by the center farmstead (Grange Farm) you might spot a special visitor and his particular conveyance.

 
The two commands of regular Royalist infantry [Jay and Larry] quickly captured the Brookfield Farm.  When the East Bergholt Local Defense Force (the East Bergholt Hunt Club) [Travis] closed, the Royalists began to advance on them with bayonets fixed.
 
From the Hunt Club's perspective, those glistening bayonets didn't look too inviting.

Meanwhile on the other flank, the red sailors from the Harwich Maritime Defence Force [Phil] seized the Bridge Farm before a section of BUF Bolton Rifles [Sean] could get there.

In the center, the Brown Brewery Workers [Mike] closed on the Grange Farm only to hear a distinctly British voice [game master] asking who they were and what did they think they were doing.  Not being able to answer to the satisfaction of the Ghurkha officer, they begin to exchange fire.

 
Another section of BUF Bolton Rifles [Ed] then appeared on the other side of the Grange Farm, satisfied the Ghurkha commander as to their bona fides, and helped drive the brewery workers away.

The Hunt Club couldn't stand against the charge of the Royalist regulars and scampered for home leaving the Brookfield Farm securely in Royalist hands.
With the Brookfield Farm securely in their control, the Royalist regulars began to sweep across the battlefield only to run into a column of Anglican Coalition reinforcements [Travis' second command].
 
The red sailors were attacked at the Bridge Farm by a section of BUF Bolton Rifles [Sean] but the sturdy walls of the building kept them safe from BUF rifle fire.

With their leader killed, possibly by one of his own men (he wasn't very popular with them), the BUF Bolton Rifles scurried away from the Bridge Farm leaving the red sailors in possession of that farmstead.


The battle ended then since I had to leave for a movie and supper date with my wife.  The Royalists held two of the three farmsteads - Brookfield and Grange - while the Anglican coalition only held one - Bridge Farm.  These results were reported to Pete.  We'll find out in two months how the big battle at Partizan turns out, having done our part in setting it up.

As far as the "Rugged Adventure" rules, they worked fairly well even though we didn't do much of the "role playing" that the rule set supports.  Unfortunately Travis was assaulted by twice his number and lost his command about two-thirds of the way through the game.  But having plenty of other commands left, he brought on a section of Anglican Coalition regulars who stopped the Royalists from sweeping across the battlefield.


Saturday, December 6, 2014

Latest Painting Results

Since I completed my figures for last month's Colonial Barracks convention I haven't been very keen to do any painting.  But lately I have come out of the doldrums somewhat and completed some figures for my Very British Civil War forces.

This 3" mortar team will join the Royalists as a heavy support weapon for the 2nd Battalion, Essex Regiment.   They seem to need it since the Anglicans and Socialists have that truck mounted naval gun.  They can also be used in WW2 games, which I did today in a mash-up between the British and some Jerry soldiers which resulted in a draw.


These two lads, the sniper on right and his spotter on left, provide another "special" weapon for the Royalists.  maybe now they can keep the crew of that darned naval gun ducking for cover!  You've seen these lads before in an earlier post.  This just shows them after they've had some shading added and had the bases flocked.
 
 
These two chaps are "extra" figures from two different command sets I've acquired recently.  The one on the right holds a map book while the other has just doffed his helmet after a long, hot trek to the front lines.  I'm not sure what they'll be used as but their addition will be welcome to the Royalist forces.
 
That's all for now.  More Later.


Saturday, October 4, 2014

British Sniper Team

Back in June, I bought a two man British sniper team made by Great Escape Games.  In preparation for a game today, I've been painting on the team, as well as another British soldier.

The sniper team consists of the sniper (middle) and his spotter (left).  The soldier on the right was a part of a purchase from last spring who finally got painted.  Although you really can't tell too well from the picture, the sniper's head covering is in a green and brown camouflage pattern as is the "ghillie" covering of the standing soldier's helmet.

The sniper and his spotter set for action.
Although I'll be using them for Very British Civil War, these are WW2 figures and will be useful in those games as well.  I'm still working on the 3" mortar team from June as well as another individual British soldier from the batch obtained last spring.
 
See this post for pictures of the unpainted figures.   

September Painting


For my game at the Colonial Barracks convention in November, I needed a number of differently armed figures for the troops in the army of the notoriously unstable warlord.  (See http://jacksongamers.blogspot.com/2014/09/send-in-marines-play-test.html for the play test report.)  So I sorted through my mountain of unpainted figures and came up with two units of poorly armed "native" figures to join the ones I was using that were already painted.


The first batch are eleven Foundry Belgian askari in straw hats.  They are counted as being armed with percussion rifled muskets, even though the game is set in the 1930s.  The white lines on the front designate the forward center for facing during the fire sequence of the rules I am using, "The Sword to Adventure" which is a variant of "The Sword and the Flame."
They are joined in one command by nine musket armed tribal warriors, also from Foundry.  Eventually both of these groups will join my Darkest Africa forces.

The second unit is made up of descendants of escaped slaves, called Maroons in the local vernacular because of the reddish-brown color of their skin (This by the way is historically accurate, the maroons being escaped slaves from Jamaican plantations living in the interior hill country.)  These guys are armed with percussion smoothbore muskets but are also decent hand-to-hand fighters.  Their leader is in the red shirt in the center whose name is Daddee John, an ancestor of P'hat Daddee B'wonah, the President for Life of the Republic of Bongolesia (with apologies to Murphy).


This is the other half of the Maroons.  Although they fight for the notoriously unstable warlord, they really don't like him at all and, given the chance, would shot him in the back.  These figures are from Foundry's Pirates range.  They will join my small collection of pirates figures after the convention.
 

While these figures were fun to paint as I could almost let my imagination run away with me on their clothing, the last batch were more of a staid group, being more "armed civilians" for my Very British Civil War forces.


These armed civilians are from the Artizan Design partisan and guerilla lines that Brigade Games carries.  Their clothing also works for 1930s British.  Their leader is in the center and you can tell from his beret and leather jacket that he is a veteran of the Spanish Civil War.  They'll join the other armed civilians I already have.

September was a very productive painting month with 50 figures painted and two buildings made.  I think that I am finally out of my summer painting slump and I hope that the rest of the year will be just as productive. 


Friday, September 5, 2014

Very British Civil War Mercenary Band

The other day, Very British Civil War Forum member Panzerkaput brought up a topic about the use of mercenaries during the VBCW.  There was some discussion about their use, which you can read at the afore mentioned link.  I realized that I had never posted a picture of the small mercenary band I had created for my VBCW gaming.

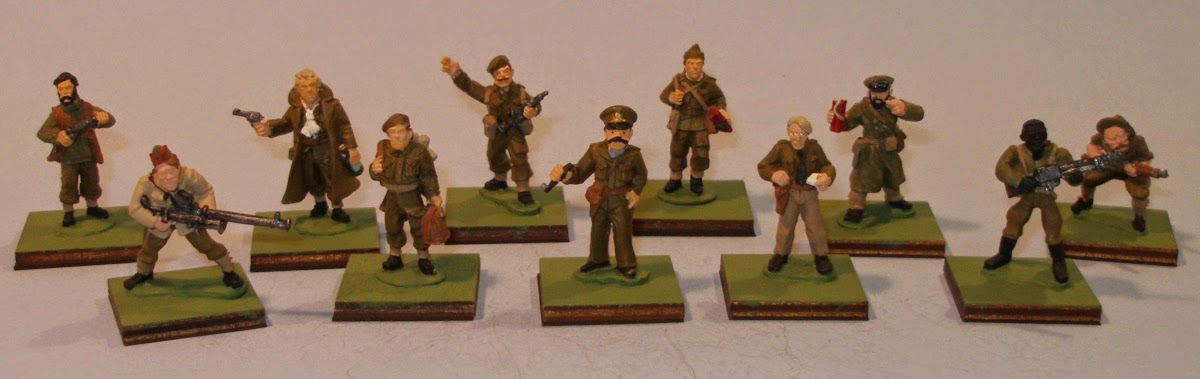
These bravos have been hired by the Bishop of Cambridge to augment his forces against the Royalists and British Union of Fascists operating out of Colchester in eastern Essex against his allies in southwestern Suffolk.  Six of the figures are Artizan Design's Cadd's Commandos (pack PLP552 and pack PKP566) that I purchased from Brigade Games and the other five are Pulp Figures' General Cappy Boyd and his Expatriate Mercenaries.

So without further ado, here they are:


The band includes the commander (center) with his batman carrying his briefcase and golf clubs, an  executive officer, a sergeant with a submachinegun, two dynamite experts, a Boys antitank rifle gunner, a Browning automatic rifleman, another submachinegunner, a rifleman, and a "grounded" pilot (carrying the reason for his grounding - a bottle of MacCleave's Best Whiskey).  I'll probably add some additional figures as I come across them.


Monday, July 28, 2014

Pulp Figures Film Crew

Over the weekend I finally completed painting and basing my 28mm Pulp Figures film crew.  Bob Murch did a great job with the sculpting.  I just hope my paint job does them justice.

Posed in front of my British Union of Fascists propaganda truck, we have (from left) the script girl, director, camera man, and clapper.
I haven't assigned names to them yet so I'm open to suggestions. 

I plan on using them for various games in the Interwar period such as Pulp actions, Back of Beyond, and Very British Civil War.

Wednesday, July 23, 2014

VBCW Soldiers, Civilians, and Scenic Effects

On Monday I received a small order from Recreational Conflicts, a US manufacturer and distributor, of some civilians and scenic effects.  I thought that the unpainted pictures might be interesting.  As usual, please click on the images to get a larger picture.

The six civilians I received are made by Ainsty and Lead Bones, the manufacturing arm of Recreational Conflicts.  First the two Ainsty castings, from the AGGRO line, are pack #AGG104, St. Johns Ambulance or Traffic Wardens.  I'm going to use them as a crew for my Rolls Royce ambulance that I've had for a while.  Although the female figure is in pants, that doesn't bother me as I suspect she would be a "rough and tumble" sort of woman to join the Royalist ambulance corps.


The four Lead Bones castings are next.  They are a set of four clerks although I will only use two (right pair) as shop keepers.  The other two will become a town leader (left center) in his smoking jacket (maybe the mayor) and a nurse (far left) at the local clinic.


The scenic effects are two of Ainsty's trade goods packets.  The first consists of five boxes of rifles, three with separate tops and two closed.  They'll be used as objective markers in future games.  Our friends Maude and Charlotta give some sense of scale to these boxes.


The other packet consists of four piles of mixed trade goods with Maude and Charlotta giving a sense of scale.  Again, these will become objective markers in future games.  Ainsty has many other sets of trade goods, almost all of which would fit into a VBCW game, as well as Colonial and Pulp games.


I'm excited about these and look forward to getting them painted and available for use.

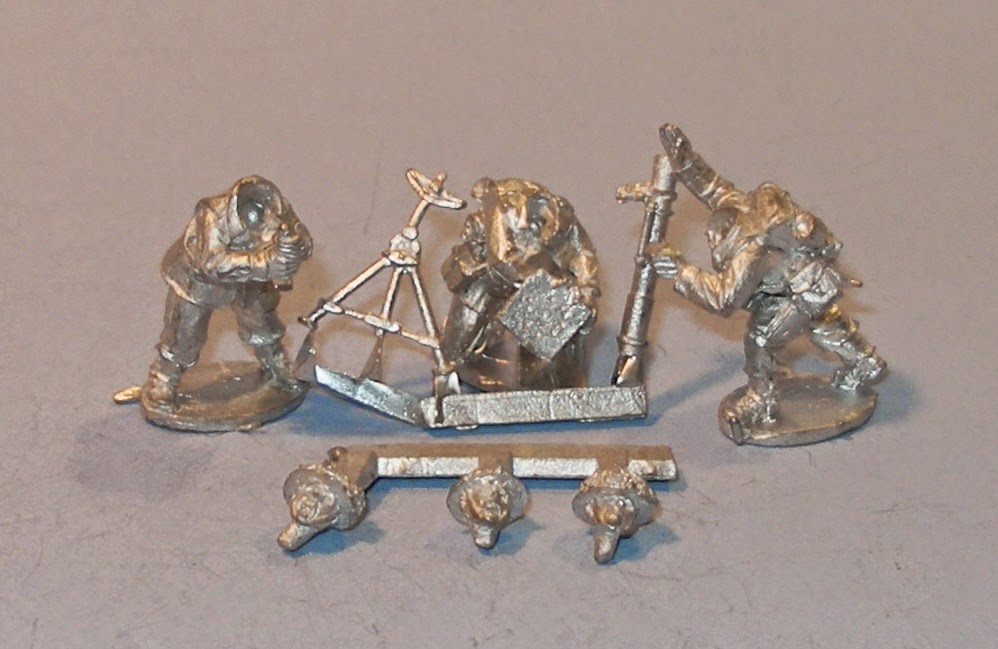
Last month at our regional Bayou Wars convention, I was able to buy two packs of WW2 British soldiers from my friend Rudy of Time Portal Hobbies.  The first is a three man 3-inch mortar squad from Warlord Games.  They come with separate heads.  The mortar has a tube, support legs, and baseplate while the crew consists of a gunner (right), loader (left), and shell preparer (center).  This mortar team will tend to offset the naval gun that the Harwich Maritime Defence Force has on the Anglican League side.


And the second is a two man sniper team from Great Escape Games.  Although my set has a kneeling spotter rather than the standing one illustrated, I think the kneeling spotter/escort figure looks better.  Now they can both hide amongst the bushes to pot the Anglican leaders.


Both of these packs will join my Royalist 2nd Battalion Essex Regiment.

More later as I get these painted.

Monday, July 21, 2014

Residential Houses - Finished

This past weekend I finally completed the two residential houses that I have been working upon for a couple of weeks.  From previous posts you will recall that these are paper mache "box" houses that I bought on sale at a local Michael's craft store.  Clad with paper brickwork adorned with doors and windows and paper roofing shingles, they are mounted on a 5mm foam core base.

Brick paving was added to the back in the form of a small patio and a walk to the back gate.

Here are the backyard walls with Missus Maude and Charlotta looking at the improvements.

On the fronts, I added iron rail fencing made from plastic sewing mesh that was suitably cut and trimmed and a cobblestone sidewalk.

The rears with all the brick paving in place, plus the walls and the rear cobblestone pathway intersected by the brick alley.

The front fencing has now been painted a gloss black and looks more like the wrought iron it is meant to be.

Grass has been planted in the small front yards and down the sides ...

and in the back yards.  The back yard walls have finally be glued into place.  The two houses are not glued into place but are held fairly securely by the front and rear stoops and the front fences and rear walls.

The final product in a sunny setting atop an old tree stump in my back yard.

And the rear view.
 In addition to finishing the two residential houses, the East Bergholt town hall was secured to its base, also 5mm foam core.

The borders were covered with cobblestone sidewalks.  The town hall still needs its sign over the front door.  The back door may become the town constabulary entrance if I can't find a suitable building for them.


More anon as I still have a fourth "Michael's" building to clad, many more paper buildings to cut out and construct, and some more "wilder" hedges to make, probably using this technique that was posted on The Miniatures Page:  DIY Bocage Hedges .


Friday, July 11, 2014

Residential Street in East Bergholt

I've taken two of my paper mache buildings (see previous post) that are clad in the same type of brick and used them to create a small residential street in my VBCW town of East Bergholt.  They will be mounted on a piece of 5mm foamcore that will front on one of the cobblestone streets of the town.

This shows the front of the lot with the cobblestone sidewalk and short brick paths leading to the front doors.  There will be an iron fence made from plastic sewing mesh along the front and a narrow yard between it and the buildings.  I'll lay a brick alleyway down between the buildings.

Here is the rear view showing the beginning of the brick wall enclosed back yards.  These yards will have brick wall across the rear with a gate.  Inside each yard will be a small brick patio and either a small garden or a landscaped tree, depending on how much room I have inside the walls.

The brick walls and pillars are downloads from Dave Graffam Models paper building web site:  http://www.davesgames.net/catalog-low-walls.htm .  The wall printouts are wrapped around 5mm foamcore and the pillars around balsa wood to provide some stiffening to the paper.  I've used his paper buildings and walls on other VBCW projects and have been satisfied by the relative ease of assembly and the value, especially when you can print as many copies as you need and change the "skin" of the model.  These walls can be printed in red or gray brick or in gray or brown stone and in lengths from 1" up to 6" in 1/2" increments.

More later.

Monday, July 7, 2014

Progress on Paper Mache Houses from Michaels

Back in January 2014, I was lucky to find four large paper mache houses on sale at one of our local Michael's craft stores.  Michaels Houses   Some time after that I discovered a web site with a wealth of building and scenery photographs.  CGTextures   You have to sign up to use the site but it doesn't cost anything.  Check it out and I'm sure you will find many useful images.  Even with the most basic imaging software (paint.net), I was able to add various windows and doors and maneuver bits and pieces around to make the appropriately sized skins.

From that site I was able to construct "skins" for the houses.  A month or so ago I finally started applying the "skins."  This is a report of the progress as of about a week ago.


Here is the roof section of one of the houses with the brick wall skin around the base and the roofing shingle skin being applied.  It was a challenge to work the shingling around the dormer but I had printed enough sections so I could piece it together.  Although I used glue sticks (background) for the main building wall sections, I used white glue for the shingling and the chimney skin.  It seemed to work just as well as the glue sticks.


Here is one of the houses almost completely clad in its "skin."  At the time I took this picture I still had to print some more corner moulding for the upper section.  That has been done and it looks much better.  This building will eventually be my town hall for East Bergholt.  The figure is a 28mm Battle Honours early WW1 British officer who is being used as the lieutenant colonel commanding the Anglican coalition forces in south-west Suffolk in my Very British Civil War universe.


And here is a second building (on left) being clad in its skin.  I cut and moved the wall pieces higher towards the divide between the lower building part and the roof part which, I think, makes the buildings look better.  The piece I trimmed off the top was then glued along the bottom.  This second building and a third similarly clad are being mounted on a piece of foam-core to serve as a small set of apartment buildings for my town.  They will have walled back yards with a brick patio and some flower beds.

The second and third buildings now have their complete "skins" applied.  I still have a fourth one to do which will hopefully happen later this week.  Another progress report will be forthcoming.

Cheers!