Please click on the pictures from a larger image.
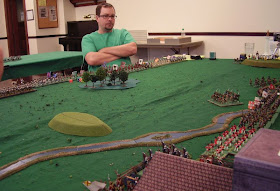
Mark Stevens, the Imperium commander, watches as the light troops battle winds down and his two center brigades begin to appear on the battlefield.
On the Imperium left flank, Clay James' brigade of Sachsen-Wachsenstein (near) and Courland (far) battalions march on in perfect order, flags flying and drums beating!
In the Imperium center, Mark Stevens brigade of Courland and Sachsen-Wachsenstein grenadiers (on the left) and John Murdaugh's brigade of Imperium and Reichs Armee battalions (on the right) advance astride the road from Alt Kirchendorf to Eisenmuhlen. A few Pandurs are still in front and the light cavalry melee is drawing to a close on the far right.
And on the Imperium right flank, Phil Young's brigade of Reichs Armee battalions and two squadrons of Courland cavalry march on in good order.
Another picture of Phil's brigade, this time as seen from the Carpanian defender's perspective.
A company of Carpanian jagers hides behind a small woods as the Courland Timofievich Cossacks ride by on the far side. The jagers battle was over and they did want to tangle with those madmen and their lances!
The Carpanian and Brittanian light troops continue their withdrawal behind the main battle lines while the Imperium forces begin to advance onto the main table.
Clay James observes the Carpanian light troops withdrawing behind their battle line as his brigade continues its advance. Just beyond the roofs of the cannon foundry stands the red-coated Fusiliers of Bremen, a battalion hired by Brittanian gold to assist the Electoral cause.
The Carpanian right, commanded by Larry Reeves, and center, commanded by Bill Hamilton, man their defensive works as the Imperium troops continue their slow approach.
[NOTE: The Martian walker is NOT part of the Carpanian army!]
[NOTE: The Martian walker is NOT part of the Carpanian army!]
Phil's Imperium brigade and cavalry continue to advance. So far as they can tell, there are no defenders to their front. Can this be true? Do they have an unimpeded route into the electoral left rear?
Larry Reeves keeps a hawk eye watch on the Imperium forces as they advance toward his defenders. In the foreground, the Carpanian defenders of the cannon foundry are ready to repel any Imperium assaults. They have pulled the four newly cast guns into the line and spread their available gunners out to man them, assisted by some drafted infantry.
A view from the perspective of the Carpanian defenders. A company of jagers temporarily mans an outwork around a small farm while the Courland and Sachsen-Wachsenstein grenadiers approach them.
A good picture looking down the Carpanian defensive line with Campbell's Highland Battalion in the foreground, anchoring the left of the defensive line.
An overview of the main battle field with the Imperium attackers on the right and the Electoral defenders on the left.
Phil's Imperium brigade continues its unimpeded advance on the right flank. Is there really nothing ahead of them?
Well, not exactly. As the Courland cavalry advances around the tip of the woods, they suddenly espy the two squadrons of the Hapnich Dragoons, who immediately begin to trot towards them.
With a clash of sabers, the two evenly matched cavalry forces meet!
Men shout! Horses scream! Sabers ring against each other!
And while the cavalry engage in the background, Phil's Imperium infantry get just close enough to the woods to observe that they are filled with the red coats of a brigade of Brittanian infantry.
Where did they come from?!? They were reported by spies to have marched off to rejoin their comrades northeast of Minden with the main Brittanian army!
Just goes to show that you can't believe everything a spy tells you. He may be working for the other side.
Where did they come from?!? They were reported by spies to have marched off to rejoin their comrades northeast of Minden with the main Brittanian army!
Just goes to show that you can't believe everything a spy tells you. He may be working for the other side.
[Note: The game master learned this deviousness from his long time gaming partner, Jay "Lord Sterling" Stribling.]
As the Imperium troops begin to react to the surprise appearance of the Brittanians, the Fusiliers of Emden (another Brittanian hire) on the far left of the Electoral line breath a sigh of relief. They really weren't looking forward to having to deal with four Imperium battalions, even if they were all Reichs Armee units.
Stay tuned for Part 3 of the battle report as we resolve the action and conclude the battle.


Some fine photos, gentlemen. It looks like you had a wonderful battle.
ReplyDelete-- Jeff
Wow what a strong defensive position! Looks like a tough battle with great photos. Thanks for sharing...
ReplyDeleteAn excellent report and some lovely pics! Thanks for sharing.
ReplyDeleteIt was a strong position but it was never tested by the Imperium troops. I let the light troops battle go on one turn too many and this delayed the advance of the main battle line. That plus the lateness of the hour resulted in a stalemated game, unfortunately.
ReplyDeleteJim